|
We dispatch Daylilies from 1st May - 30th November. You receive bare rooted, healthy fans with trimmed foliage. |
ABOUT DAYLILIES
Daylilies are a perennial not a bulb.
Daylilies are an easy care, low maintenance plant easily grown in most climates.
The peak blooming season for DAYLILIES in Australia is from November – January.
They can withstand droughts, floods, boggy conditions, snow, frosts, high winds, sea salt sprays so you can grow them in coastal areas. They are great grown in cottage gardens, around ponds, in pots (no smaller than 3 litre pots), patios, down the sides of driveways and on steep embankments to help with soil erosion.
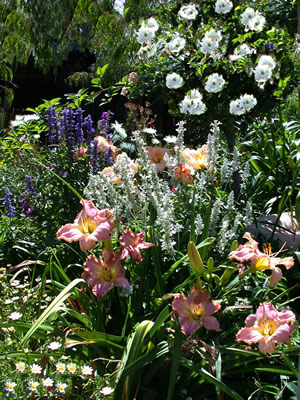
They are truly a rewarding plant adding a splash of brightness to any garden, bringing many hours of joy for years to come. The modern daylily comes in a variety of colours, shapes and sizes. There is a daylily to suit every garden as they come in a wide range of colours, except a true blue but hybridizers are working on this. They come at different scape heights, as tall as 50 inches - over a meter high, usually taller with the spider varieties or as low as 12 inches /1 foot (miniature varieties). We have Spider Daylilies, where the petals can reach up to 16 inches and curled, Double Daylilies - these are multi petaled, Miniature Daylilies (small blooms 2–4 inches wide), these are great for borders and we have the standard varieties where the blooms range from 4 – 10 inches wide. Some blooms are fragrant whilst others have diamond dusting glistening in the sun. Some have frilled or heavily ruffled edges, some with bright bold eyes.
 Daylilies usually flower from Spring to Autumn with a few cultivars flowering almost non-stop for several months. Some re-bloom in winter. Usually daylilies have between 2-4 flushes of bloom throughout the year and although blooms last only one day, each individual flowering scape can have as many as 35 buds some varieties more. A large clump in bloom has several scapes at varying stages of maturity giving an extremely long flowering display. Whilst daylilies are best grown in full sun, a minimum of 6-8 hours sun every day is needed to ensure reliable flowering and good plant growth.
GENERAL
When your daylilies arrive they will be bare-rooted with the leaves trimmed. Leaves will be trimmed back to minimum sent to Tasmania and S.A. due to quarantine regulations. If desired soak daylilies overnight in water with a little Seasol to refresh the root system or plant immediately and water with the solution to help with any transplant shock. After you have planted your newly arrived plants, the outer cut leaves may yellow off and die back, this is normal. At the same time new growth will emerge.
I have “Search by Colour” tabs in my menu where you can search daylilies by colour. If you are looking for “REDS” tap on the red tab etc.. If you are searching by a cultivars name you can either type in the name of the plant you are looking for in the “Search” button or look it up in the A-Z section. Also check out the Eyed & Fancy & Bicolour /Bitones categories as these have a mixture of colours that you might find interesting.
I have code details for my plants e.g: Ht 26” TET. Ev. Re Bl 6” = Height is 26 inches, TET/DIP is the ploidy of the plant - Tetraploid having more chromosomes than the Diploids, (this is only important if you are wanting to hybridize and gets seeds from daylilies). You can not cross a Diploid variety with a Tetraploid variety. Ev/ Sev/ Dorm = Ev means the foliage stays evergreen all year round, SEv means it is a Semi Evergreen cultivar where the foliage cuts back to half, whilst new foliage comes through. This usually happens during winter but can happen during summer. Dorm = Dormant varieties, where the plant foliage disappears during winter (the plant is not dead), new foliage appears in spring. Re. = Re-bloom, where the cultivar is a re-bloomer during winter or sending up more than one flush of scapes through the year. Some cultivars re-bloom/flush up to 4 times in the year. Bl 6.5” = Bloom size 6 and a half inches.
SOIL PREPARATION
A well drained friable soil is ideal. Prepare the soil in advance by adding organic matter, fertilizer or blood and bone and digging thoroughly mixing into the soil. You can add a 9 month slow release fertilizer if desired. Space daylilies approximately 60cm apart or less for smaller growing varieties (miniatures). When planting dig the hole approximately 12” wide and deep. Make a mound on which the crown of the daylily will sit and spread the roots out and downwards into the hole, similar to rose planting. Do not plant too deeply. The crown should not be covered with more than 2.5cm of soil. Firm the soil around the plant then water well. Generally water your new plants twice a week, without making the soil too boggy, this should be enough while they re-establish.
WATERING
Daylilies are reasonably drought tolerant and will survive on a small amount of water and natural rainfall. For optimum flowering performance, regular deep watering twice a week is beneficial when flowering scapes begin appearing and during the bloom season and hot summer months.
FERTILIZING
I fertilize once or twice a year, basically when I think they need it. Any of the following can be used on daylilies. Aged animal manures, blood and bone, dynamic lifter, Charlie Carp or any good organic fertilizer containing potash is ideal. Nitrogen based fertilizers encourages leaf growth at the expense of flowers. Daylilies grow compatible along side roses as they like the same feed and mulching as these. MULCHING A good quality mulch will reduce heat, help conserve water and reduce weeds. You can use compost, bark chips, straw, leaves & shredded up newspaper. Do not place mulch up against the crown of the plant as this can inhibit flowering.
DISEASES
CROWN ROT: Should you ever get crown rot it is essential that you remove all the soil where the roots and crown have rotted and discard into another part of the garden where you do not grow daylilies. Do not plant another daylily in the old soil as the pathogen remains in the soil and will spread to the new plant. Remove all rot from crown, clean with water and part bleach leave out to dry for a day or 2 in a cool dry place and replant in clean soil/potting mixture.
 THRIP, APHIDS & SPIDER MITES
Natural alternative treatment is preferred, if they appear in plague proportions you may need to purchase a suitable insecticide from a nursery. Try soapy water first if you only have few daylilies, Eco-oil or Natrasoap.
HEMEROCALLIS RUST
Daylily rust is a pustule of orange red brown powder that can appear on the daylily leaves. Fortunately I have never had daylily rust on my plants, nor seen it. I have been told by a few Daylily experts that it could not survive here in our cold winters in the South West. If you suspect you have daylily rust use a slightly damp tissue and wipe the back of the leaves, if you are left with tell-tale symptoms of orangey powdery substance then it’s quite possible this is rust. Don’t get confused with common soil splash. There are several sites on the web explaining daylily rust and there are sprays available to keep it under control.
Rainbow Daylilies & Irises
www.rainbowdaylilies.com
Phone: 08 97553006 Mobile: 0437 206 207
Address: P.O Box 504, Dunsborough W.A. 6281
Email: rainbowdaylilies@hotmail.com